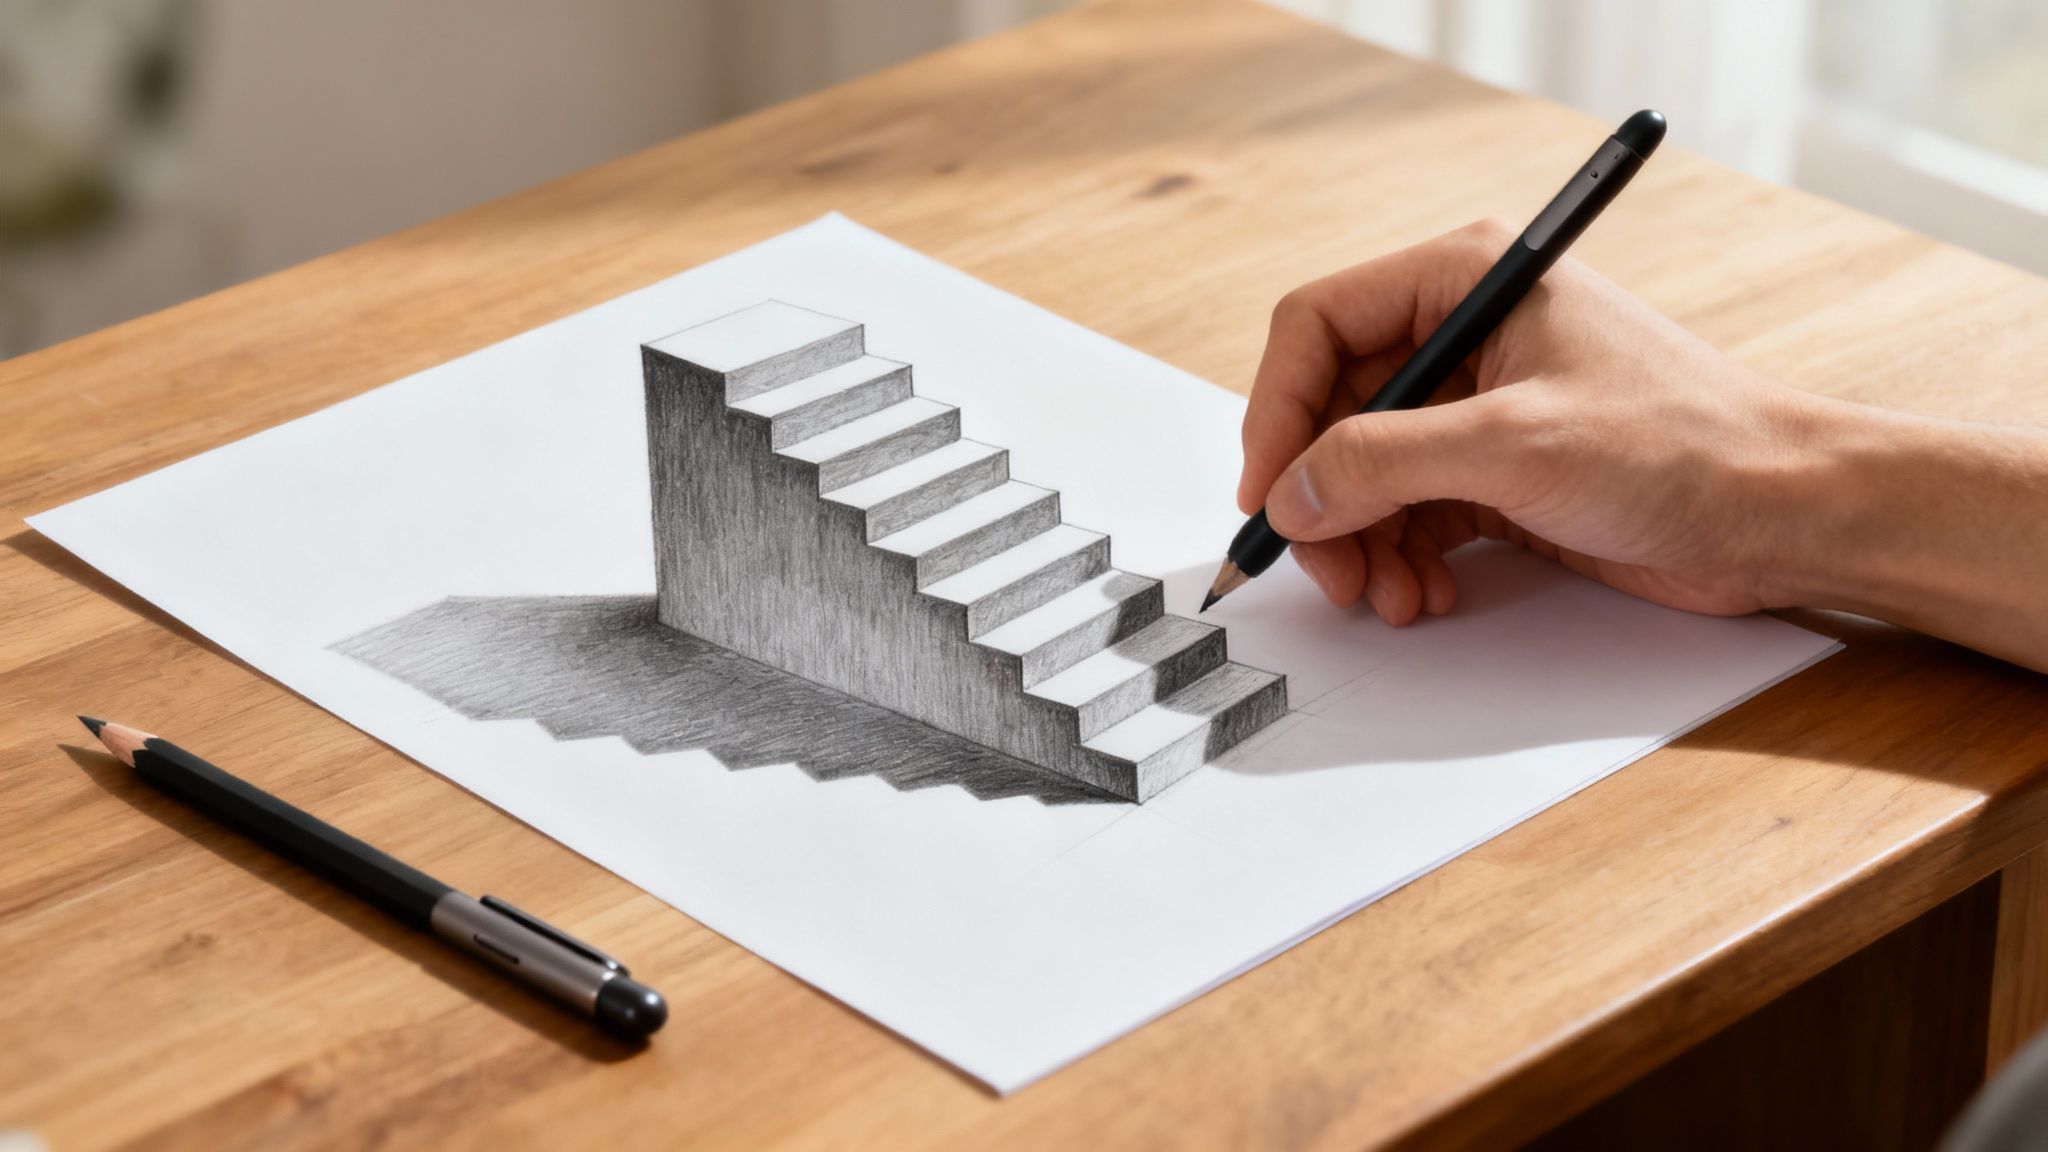
A 3D drawing illusion is an artwork created on a flat, two-dimensional surface that, from a very specific angle, appears to be three-dimensional. These illusions are a clever mix of perspective, shading, and distortion, all designed to trick your brain into seeing depth and solid form where there is none.
Ready to create art that genuinely seems to leap off the page? The first step in any creative project is often the most challenging: generating a truly unique concept. If you're looking for a responsible and efficient way to spark your next idea, the Creative AI OS is an excellent place to start. It helps visual creatives explore possibilities in a safe, streamlined environment, and you can try it for free to see how it can enhance your workflow.
Bringing Your First 3D Illusion to Life
Making a mind-bending 3D drawing is an incredible fusion of artistic talent and psychological trickery. It’s not just about drawing well; it’s about knowing how we perceive the world and using that understanding to bend reality on paper.
Before you even touch pencil to paper, the hardest part can be coming up with a concept that will actually stop people in their tracks. This is where modern tools can give you a massive creative head start.

Unlocking Ideas with AI
That blank page staring back at you can feel pretty intimidating. But AI can be your secret weapon, generating unique visual ideas in a matter of seconds. Instead of wrestling with creative block, you can instantly visualise different concepts and compositions.
Here’s how it helps you get going:
- Concept Generation: Describe a scene—something like "a floating teacup pouring a waterfall"—and get multiple visual takes on it.
- Perspective Exploration: Ask for an image from a specific angle, like a "worm's-eye view of a skyscraper," to get a feel for how extreme distortion works.
- Style Experimentation: Mix and match different artistic styles to come up with a truly original 3D drawing illusion.
This initial step smashes through creative blocks, freeing you up to concentrate on the technical side of bringing your vision to life.
The Psychology Behind the Art
At its heart, a 3D drawing illusion is an exercise in applied psychology. The technique is known as anamorphic art—creating a distorted image that only snaps into focus from one perfect viewpoint. Your brain is hardwired to interpret visual cues like shadows, perspective lines, and overlapping objects to build a 3D model of what’s around you. Anamorphic artists just play with those rules.
The magic of anamorphic art lies in its ability to hijack our perception. By presenting the brain with meticulously crafted, distorted visual data, the artist forces it to resolve the image into a believable three-dimensional object, creating a powerful and surprising "Aha!" moment for the viewer.
This kind of perceptual manipulation has a long history. One of the most famous illusions, the Rubin vase, was developed around 1915 by Danish psychologist Edgar Rubin. It’s that classic image where you see either a vase or two faces, but never both at once. It brilliantly shows how our brain separates a subject from its background—a principle that is absolutely fundamental to how we perceive depth in art. You can find out more about the history of illusion art.
Assembling Your Illusion Artist Toolkit
Before you can start bending reality on paper, you need the right gear. Creating a convincing 3D drawing illusion depends as much on your tools as your technique, whether you love the feel of traditional materials or the endless possibilities of a digital canvas.

The route you take—old-school or modern—will define your workflow, but both can lead to incredible, mind-bending art. Honestly, many of the best artists I know use a hybrid approach, grabbing the best from both worlds.
The Traditionalist's Core Kit
For artists who work by hand, that connection between your hand and the paper is everything. The texture of the paper, the specific grade of your pencil, the pressure you apply… it all becomes part of the final illusion.
Here’s the absolute minimum you’ll need to get started:
- Graphite Pencils: A solid range is non-negotiable. Grab a harder pencil like a 2H for sketching faint guidelines you can easily erase. Then you'll need softer ones, like a 4B or 6B, to build up those deep, rich shadows that make an object feel like it has real weight.
- Quality Paper: Go for something smooth and heavyweight—think 150 gsm or more. A smooth surface is your best friend for blending, which is the secret to creating those believable gradients and soft shadows.
- Blending Stumps & Tortillons: These tightly rolled paper sticks are essential for getting silky-smooth gradients. They let you smudge graphite precisely without the oils from your fingers messing things up. A clean finish is a professional finish.
- Erasers: You’ll need a kneaded eraser for gently lifting off graphite and a precision eraser for carving out sharp edges and creating those final, crisp highlights.
These are the fundamentals. They form the backbone of any serious illusion artist's setup.
The Digital and AI-Powered Workflow
If you prefer a screen to a sketchbook, the digital toolkit offers some serious advantages. It opens the door to endless experimentation without burning through stacks of paper. The ability to hit 'undo', work in layers, and perfectly tweak colours is a total game-changer, especially for complex illusions.
Your essential digital gear looks something like this:
- A Drawing Tablet: Whether it's a simple screenless model from Wacom or a display tablet like an iPad Pro, pressure sensitivity is the key. It gives you control over your line weight and opacity, mimicking the feel of a real pencil.
- Art Software: Programmes like Procreate, Adobe Photoshop, or Clip Studio Paint give you the brushes, layers, and transformation tools you need to shade and distort your creations into a 3D illusion.
And now, we're seeing AI platforms like Virtuall become a huge part of the process. They can generate complex anamorphic grids for you—those distorted guidelines that are a nightmare to calculate by hand. AI can also help you preview your art from different angles, saving you hours of tedious work and letting you focus on being creative. If you're looking for inspiration, many of the best free AI image generators are a great place to start.
AI handles the mathematical heavy lifting, freeing you up to experiment more boldly. You can test out multiple perspectives and lighting setups in minutes—a process that would take days to get right by hand.
Choosing between traditional and digital tools really comes down to personal preference and the specific demands of your project. Let's break down the key differences.
Traditional vs Digital Tools for 3D Illusions
Ultimately, there’s no "right" answer. The best toolkit is the one that removes friction and lets your creativity flow. Whether you’re blending graphite on paper or manipulating pixels on a screen, having the right equipment is the first real step toward creating a believable 3D drawing illusion.
Sketching with Anamorphic Perspective
Anamorphic perspective is the secret sauce behind every jaw-dropping 3D drawing illusion. It’s the art of drawing a deliberately warped image on a flat surface that magically snaps into a convincing three-dimensional object when seen from just the right spot.
You're essentially drawing something stretched and distorted, as if viewed from an extreme angle. When someone looks at your drawing from that exact same angle, their brain does the heavy lifting, piecing the distorted image back together into something that feels solid and real. It's that "Aha!" moment when a flat sketch suddenly leaps off the page.
Find Your Viewpoint First
Everything hinges on the viewpoint. This single decision dictates your entire setup, from how you sketch your grid to the final angle you’ll use to photograph your work. Think of it as the "sweet spot" where the illusion comes to life.
Before you even touch pencil to paper, you have to lock this in. A common rookie mistake is to just start drawing, hoping the perspective will work itself out. It won't. That approach almost always leads to a flat, unconvincing result.
Here’s a simple way to think about it:
- Establish a Viewing Distance: How far back will the observer be? A closer viewpoint creates a more dramatic, extreme distortion.
- Determine the Viewing Angle: Will the viewer be looking down from above (a bird's-eye view) or up from below (a worm's-eye view)? A 45-degree angle is a solid, reliable starting point if you're new to this.
Once you’ve decided on a viewpoint, every line you draw must serve it. Consistency is what sells the illusion.
Build Your Anamorphic Grid
The anamorphic grid is your blueprint. It’s a distorted grid that acts as a guide, helping you translate a regular image into its stretched-out, anamorphic version. While drawing one by hand can feel a bit complex, it’s a foundational skill that’s worth understanding.
Picture a checkerboard seen from a very low angle. The squares nearest to you look big and wide, while the ones in the distance get compressed and squished. Your anamorphic grid mimics this exact effect on paper.
The grid isn’t just a bunch of lines; it's a map of distorted space. Each skewed box on your paper corresponds perfectly to a regular square in the real world, as seen from your chosen viewpoint. This is where mathematical precision meets artistic expression.
A great way to practise is by drawing a simple cube. Place a real cube in front of you and look at it from your chosen viewpoint. Then, try sketching what you see onto your anamorphic grid, making sure the corners of the cube line up with the intersections on your distorted grid. It will feel weird at first—you're intentionally drawing something that looks "wrong" and elongated. Trust the process.
From Simple Shapes to Complex Forms
Get comfortable with the basics first. Nailing simple shapes like cubes, spheres, and cylinders is crucial before you try tackling more complex subjects. Each one teaches you something vital about how forms behave under anamorphic distortion. A sphere becomes a long oval; a cube becomes a collection of trapezoids.
Once you’ve got a handle on those building blocks, you can start combining them. A cup is just a cylinder with a handle attached. A snake is just a series of connected, tapering cylinders. Breaking down complex objects into their simplest geometric parts makes the whole process feel much less intimidating.
This kind of practice builds an intuitive feel for perspective, which eventually frees you up to sketch illusions more spontaneously. You can see the influence of this everywhere, especially in public art. The rise of modern 3D street art was heavily influenced by Danish artists like Nikolaj Arndt, who is famous for his incredible sidewalk chalk murals. Events in Denmark dedicated to pavement art have been drawing tens of thousands of people every year since the early 2000s, proving just how much these optical tricks capture the imagination. These murals often depend on anamorphic perspective, where Eulerian geometric principles come into play, requiring you to stand in one perfect spot to see the full effect. You can read more about the evolution of data visualisation and digital art history to see how deep these roots go.
While drawing grids by hand is a fantastic exercise, modern tools can speed things up immensely. AI platforms can generate a perfect anamorphic grid for you in seconds based on your desired viewpoint. This frees you from the tedious calculations and lets you focus on what really matters: the shading, texture, and details that breathe life into your 3D drawing illusion.
Creating Depth with Shading and Light
If an anamorphic sketch is the blueprint, then shading is what gives a 3d drawing illusion its soul. It’s the single most powerful technique for turning flat, distorted lines into something with volume, texture, and weight. This is how you trick the viewer’s eye into believing an object is actually there.
Without good shading, even a perfectly calculated perspective grid falls flat. The way light and shadow play across a surface is an intuitive language our brains use to understand shape and form. Mastering this language is what separates a clever drawing from a jaw-dropping piece of art.
Defining Your Light Source
Before you even think about shading, you have to decide where the light is coming from. This isn’t just a suggestion; it’s the golden rule. A consistent light source means believable, predictable shadows, and those shadows are what sell the entire effect.
Think of it like this: one lamp in a dark room creates clear, understandable shadows. Add two or three more lamps, and you get a confusing mess. For a 3d drawing illusion, simplicity is your best friend.
- Pick one dominant light source: Is it coming from the top left? The front right? Directly overhead? Decide and commit.
- Stay consistent: Every single shadow and highlight must obey this one rule. No exceptions.
- Think about light quality: Is it a harsh, direct light creating sharp, dramatic shadows? Or is it a soft, diffused light creating gentle gradients? Hard light often works best for creating a high-impact illusion.
This decision is your compass for the rest of the process.
This process flow shows the basic steps of anamorphic sketching, starting with setting up a grid, distorting the image, and finalising the viewpoint. The infographic simplifies the technical setup, highlighting how a structured approach is crucial before shading even begins.
Mastering Core Shading Techniques
With your light source locked in, it’s time to build form. Artists have been using the same core techniques for centuries to render value (the lightness or darkness of a colour), and they work just as well today.
- Hatching: This is all about drawing parallel lines. The closer together they are, the darker the area looks. It's a great way to show the contour and direction of a surface.
- Cross-Hatching: Take hatching and layer it in different directions. This is a fast and effective way to build up really dark values and add some rich texture.
- Smooth Blending: Use a blending stump, a piece of tissue, or just the side of your pencil to create smooth, gradual tones. This is perfect for curved surfaces like spheres or cylinders where light falls off gently.
The key is to move beyond flat, one-note shading. Real objects have complex surfaces, so your shading should too. A wooden plank might call for hatching to suggest the grain, while a polished chrome ball needs smooth blending to capture its reflectivity.
If you’re interested in how these same principles apply in the digital world, the concepts behind creating surface detail are very similar. Learning how to make a normal map for 3D models is a great way to see how light interaction is simulated digitally.
The Anatomy of a Shadow
Not all shadows are the same. To create a truly convincing illusion, you need to understand the different parts of a shadow and how they work together. It’s these subtleties that really sell the effect.
A shadow is not just a dark patch on the paper; it's the absence of light. Every shadow tells a story about the object's form and its relationship to the world around it. Getting the shadows right is how you make an object feel solid.
Here are the key components you need to get right:
For a 3d drawing illusion, the cast shadow is arguably the most critical piece of the puzzle. A sharp, dark cast shadow placed directly under your object will make it look like it's hovering off the page. The further you place the cast shadow from the object, the higher it will appear to float. This one detail can make or break the entire drawing.
Adding Realistic Details and Pro Photo Tips
That final 10% of effort is what separates a decent drawing from a mind-bending 3D drawing illusion. You've nailed the perspective and mastered the shading, but the finishing touches—and the final photograph—are what truly sell the effect. This is where you make the illusion feel real enough to touch.
Too many artists call it a day after the shading is done. The pros know this is where the real magic happens. It’s about adding hyper-realistic textures, cleaning up smudges, and even physically interacting with the paper to blur the line between drawing and reality.
Elevating Realism with Fine Details
It’s the tiny details that convince our brains to buy into the illusion. Think about it: a wooden plank isn't just a brown rectangle. It has grain, knots, maybe a little splinter. A piece of metal has faint reflections and scuff marks.
Adding these micro-details grounds your object in the real world. Grab a sharp, hard pencil (a 2H works great) or a fine-tipped pen to layer in these textures. It could be the threads on a screw, the dimpled skin of an orange, or the delicate veins running through a leaf.
Hyper-realism isn't about perfectly drawing every single detail. It’s about strategically placing just enough texture and imperfection to fool the viewer’s eye. A few well-placed details are far more powerful than a cluttered, overworked surface.
Once your details are locked in, step back and clean up. A precision eraser is your best friend here for sharpening edges and lifting any stray graphite. A messy background will shatter the illusion instantly, so keep it pristine.
Cutting the Paper for Ultimate Impact
Want to really blow people’s minds? Cut the paper. This is one of the most powerful tricks in the book. By carefully trimming around parts of your drawing, you make the object look like it's literally breaking free from the page.
Imagine you've drawn a snake. If you cut around its head and tail while leaving the body attached to the paper, it will look like it's physically lifting off the surface when photographed from the right angle. This simple move adds a physical dimension that shading alone just can't match.
Here’s a simple way to approach it:
- Plan your cuts: Decide which parts of your drawing should "pop" off the page. It's usually the elements closest to the viewer.
- Use a craft knife: You'll get much more precision than with scissors. Always use a self-healing mat underneath to protect your table.
- Cut with confidence: Follow your outlines precisely. A clean, smooth cut is way more effective than a shaky, hesitant one.
This technique is a game-changer for objects that seem to float or reach toward the viewer, as the physical cut reinforces the cast shadows you’ve drawn. And if you're curious about achieving similar depth in a digital space, our guide on how to convert an image to 3D is a great starting point for digital workflows.
Pro Tips for Photographing Your Illusion
Your masterpiece is done, but remember—the illusion only truly works from a single, specific viewpoint. The final photo isn't just documentation; it's the last step in creating the art itself. A bad photo will ruin a perfect drawing.
To get the shot right, you need to obsess over three things: camera placement, lighting, and focus.
- Camera Placement is Everything: Your camera lens has to be in the exact spot you used when setting up your anamorphic grid. Being off by even a few centimetres can flatten the entire image and destroy the effect. A tripod is non-negotiable for this.
- Control Your Lighting: The light in your photo must match the light source in your drawing. If your shadows fall to the right, your real-world light source needs to be on the left. When the drawn shadows and real shadows align, the illusion becomes incredibly convincing.
- Master Your Focus: Use a narrow aperture (a higher f-stop number, like f/8 or f/11) to get a deep depth of field. This keeps both the front and back of your drawing in sharp focus, which is crucial for maintaining the illusion across the whole scene.
Common Questions About 3D Drawing Illusions
Even after you get the hang of perspective and shading, diving into a 3D drawing illusion can still throw a few curveballs your way. I've seen artists of all levels get stuck on the same common hurdles, so think of this as a quick troubleshooting guide.
It's completely normal to feel frustrated when your drawing doesn’t quite leap off the page. The good news is that the fix is usually just a small tweak, not a total do-over.
Why Does My Illusion Look Flat?
This is, without a doubt, the most common question I hear. If your drawing is falling flat, the problem almost always boils down to one of three things: your shadows, your perspective, or the angle you’re looking from. More often than not, a weak cast shadow is the culprit.
Without a strong, dark shadow, your object has nothing to ground it. It’s the key to convincing the eye it's actually lifting off the paper. An inconsistent light source is another illusion-killer, as it sends mixed signals to the brain.
- Check your cast shadow: Is it dark enough? Is it positioned correctly to sell the idea of the object floating or resting on the surface?
- Review your light source: Every shadow and highlight needs to obey the same rule. One light source means one set of consistent shadows. No exceptions.
- Confirm your viewpoint: Are you looking at the drawing from the exact angle it was designed for? Even a tiny shift can destroy the effect.
Nailing these three elements will bring a lifeless drawing back to life.
What Are the Best Subjects for Beginners?
When you're just starting, complexity is not your friend. Stick to subjects with simple, clean geometric forms. They're far easier to distort with an anamorphic grid and give you a perfect canvas to practise your shading without getting bogged down in detail.
The goal isn't to create a photorealistic masterpiece on your first try. It’s to understand how form, light, and perspective work together to trick the eye. Simple subjects let you focus on these core principles without getting overwhelmed.
Try starting with objects like these:
- A floating cube or sphere: Perfect for getting core shadows and cast shadows right.
- A simple ladder: This helps you get comfortable with repeating forms and consistent perspective lines.
- A hole in the paper: An amazing exercise for creating the illusion of depth and negative space.
Once you’ve got a good feel for these, you'll be ready to tackle more ambitious subjects.
How Can I Fix Perspective Mistakes?
Trying to correct perspective errors after the fact is tough, which is why getting your initial sketch right is so critical. If you spot lines that just look "off," it’s probably because they aren't all heading towards the same vanishing point. The best way to fix this is to go back to your underlying grid.
Don't be shy about using a ruler to double-check your lines against the vanishing point, even late in the game. Here's another pro tip: snap a photo of your work-in-progress with your phone from the intended viewpoint. Errors in proportion and perspective often jump out on a screen in a way they don’t on paper.
Ultimately, this all comes down to spatial awareness. To really master 3D illusions, it helps to build your understanding of visual spatial skills, which are the foundation of how we perceive depth. The more you develop this ability, the more spotting and fixing perspective mistakes will become second nature.
Ready to push the boundaries of your creative work? The Virtuall Creative AI OS is the perfect partner for generating concepts, exploring perspectives, and managing your entire creative workflow in one unified space. Move from a simple idea to a fully realised asset faster than ever. Try Virtuall for free and see how it can transform your artistic process.

