How does one create a normal map?
At its core, the process involves translating complex details—either from a highly detailed 3D model or a flat 2D image—into a specialized texture. This texture then simulates the appearance of that detail on a much simpler, performance-optimized model.
The most established method is baking details from a high-poly model down to a low-poly one using 3D software. However, it's also possible to generate a normal map directly from a 2D texture with appropriate tools. In either case, the objective is the same: achieving impressive visual detail without the associated performance overhead.
Understanding What Normal Maps Do
Before detailing the "how," let's briefly cover the "why." Normal maps are a cornerstone of modern 3D asset creation for a reason. They are special images that inform a game engine or renderer how light should bounce off a surface, creating the illusion of depth and detail on a low-polygon model.
Consider a plain, flat cube. With a normal map, that cube can appear to be a sci-fi crate covered in bolts, vents, and panel lines, all without adding a single extra polygon to its geometry.
It’s an efficient technique. The purple-and-blue image uses its RGB color data to represent directions. Each color channel—Red, Green, and Blue—corresponds to an axis (X, Y, Z), telling light how to behave as if those intricate details were physically present.
The Power of Simulating Detail
This technique is remarkably efficient. Instead of modeling millions of polygons for features like skin pores or the weave of a fabric, an artist can apply a normal map to a simple mesh and achieve a nearly identical result. This saves a significant amount of processing power, which is critical for real-time rendering in video games and AR/VR applications.
While the core concepts date back to the 1970s, it was in the late 1990s that normal mapping became the standard method for transferring detail. It fundamentally changed the approach to visual realism on limited hardware.
A key point to remember: a normal map only affects how light interacts with a surface. It does not change the model's actual silhouette. That’s why it’s ideal for fine-to-medium details, not for large-scale shape changes.
For a normal map to function correctly, the 3D model needs its texture coordinates laid out properly. This is done through a process called UV unwrapping, which is a foundational step for any kind of texturing. If you're new to the concept, our guide on what UV mapping is provides a complete breakdown.
Now, let's examine the different ways you can create a normal map.
Three Methods for Creating a Normal Map
Here’s a quick overview of the main methods you can use to make a normal map, which we will explore in detail throughout this guide.
Each of these methods has its place in a modern 3D workflow. The one you choose depends on your source assets, your end goal, and your time constraints. Let's dive into the most common approach first: baking.
Baking Detail From a High Poly Model in Blender
This is the classic, industry-standard way to create a normal map. For anyone creating high-fidelity assets for games or films, this is a fundamental workflow to master. It involves transferring intricate sculpted details from a high-poly model onto a simpler, performance-ready mesh.
Think of it as having two versions of the same asset. First, a high-polygon model that's packed with detail, like a sculpted pillar with deep cracks and worn edges. Second, a low-polygon, UV-unwrapped version that’s essentially a simple cylinder. The process works by "baking" the surface information from the complex model onto the simple one's texture space, creating a normal map that simulates all that geometry.
This diagram breaks down the core steps for setting up a high-poly bake.
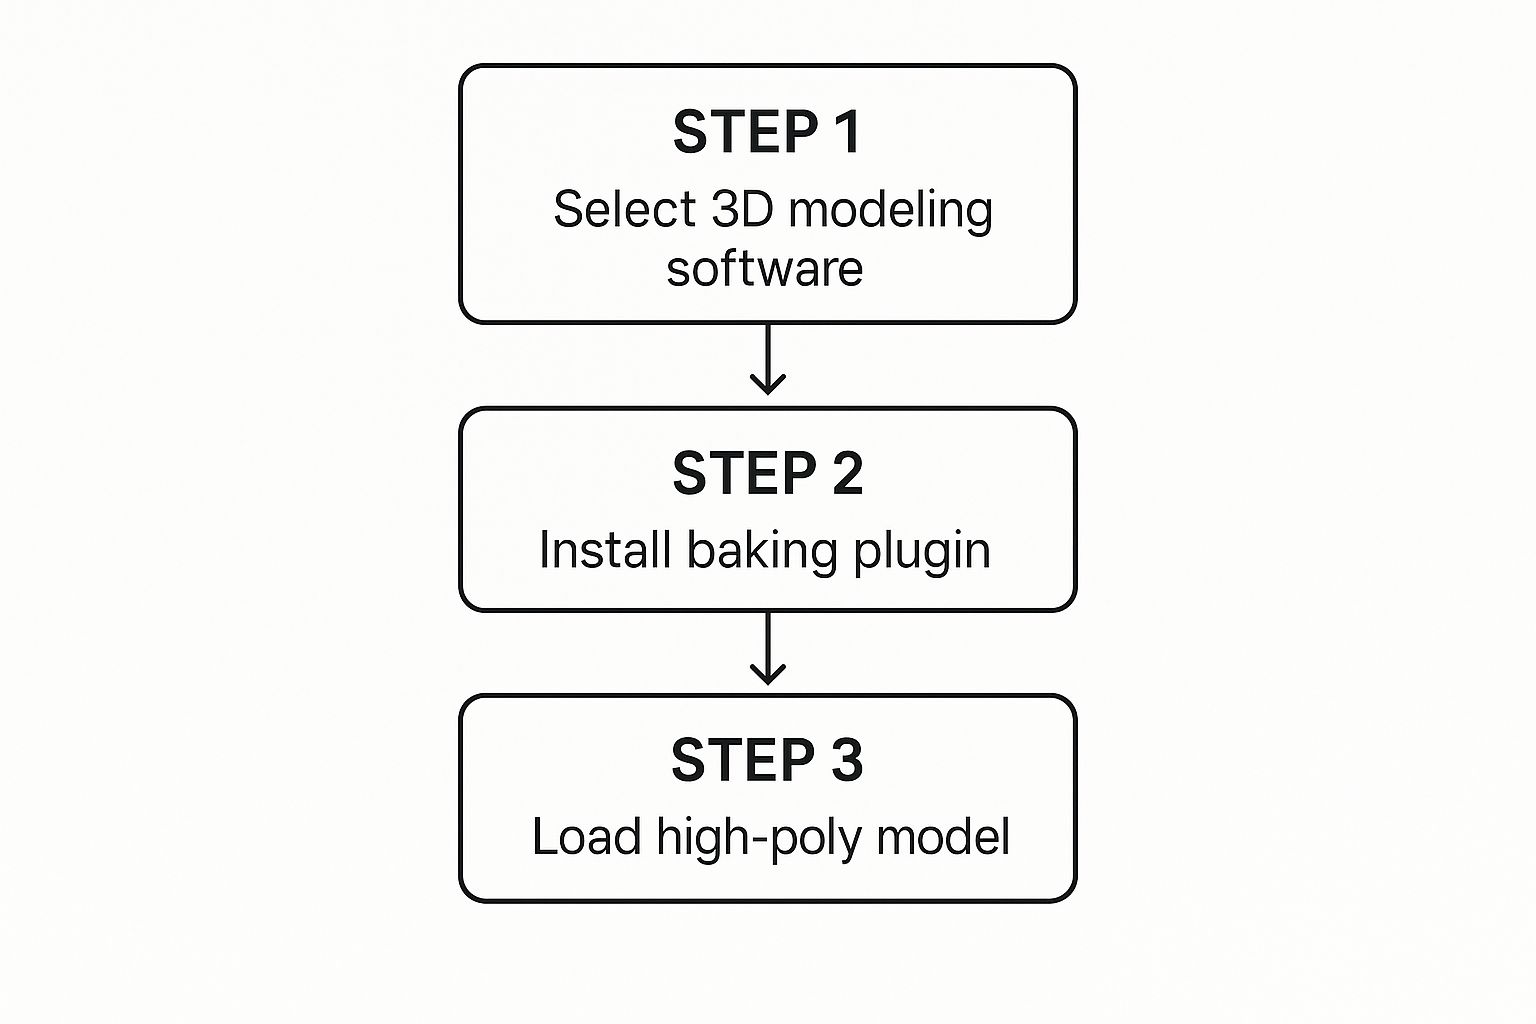
As you can see, the process begins in your 3D software of choice. You need to ensure it has robust baking capabilities, whether they're built-in or available through a plugin.
Setting Up the Bake in Blender
Inside Blender, the key to this process is the "Selected to Active" baking option. It's a simple but powerful concept. First, you select your high-poly model, then you hold Shift and select the low-poly model, which makes it the "active" object. This tells Blender to transfer the details from the high-poly mesh to the active low-poly mesh.
You'll find all the baking operations located in the render properties panel, but remember, you must be using the Cycles render engine to see them.

One setting that often challenges artists is the cage. This is perhaps the most critical part to get right. The cage essentially tells Blender how far to "look" from the surface of the low-poly mesh to find the details on the high-poly one. Configuring this setting correctly is the difference between a perfect bake and a result with errors.
- Projection errors: If your cage is too small, it won't "see" all the details on the high-poly model. You may end up with black spots or entire chunks of detail missing from your final map.
- Artifacts: On the other hand, if the cage is too large, the projection rays can become confused and hit other parts of the mesh, creating strange lines, smudges, and distorted details.
Getting the cage extrusion and max ray distance just right often requires some trial and error. A good practice is to start with small values and slowly increase them. Perform a few test bakes. You’re looking for the ideal point where you get a clean result with no artifacts. This is the key to translating a complex sculpt into a flawless, efficient normal map.
By carefully preparing your models and taking the time to master these settings, you can produce assets that look incredibly detailed while maintaining high performance—the primary goal of real-time 3D.
Creating Normal Maps from 2D Images
Sometimes you may not have a high-poly model to bake from. This is a common scenario.
Many professional texturing workflows rely on creating normal maps directly from 2D images. It’s an incredibly fast and effective method for environmental surfaces like brick walls, wood grain, or metal plates where a detailed sculpt would be unnecessary.
The process relies on software that can interpret the light and dark values of a source image. Lighter pixels are treated as "high" points and darker pixels as "low" points, which the tool then converts into the directional data a normal map requires. This is how a flat photo of tree bark can be turned into a texture that realistically catches the light.

This technique is a significant time-saver, especially for tiling textures. The main consideration is that the quality of your source image is paramount. You'll get the best results from clear, evenly lit photos with strong contrast.
And if your texture needs to repeat across a large surface, you'll first need to learn how to create seamless textures before generating the normal map.
Adjusting for Realism
The art of this method lies in fine-tuning. Most tools—from older Photoshop filters to dedicated apps and online converters—give you sliders for intensity and blur. A common beginner mistake is to set the intensity too high, which creates an artificial, "puffy" look where every detail seems overly embossed.
A subtle normal map is almost always more convincing than an overpowering one. Your goal is to suggest depth, not to make the surface look like it's shrink-wrapped in plastic. Always start with low intensity and slowly increase it until the detail feels appropriate.
Here are a few tips to achieve a more convincing result:
- Blur Your Source First: Before generating the map, applying a very slight blur to your original image can smooth out digital noise. This helps prevent harsh, jagged details from appearing in the final map.
- Consider Inverting: Depending on the software, you might need to invert your source image. For instance, if you want the dark mortar lines of a brick wall to recede, they must be the darkest part of the image before you convert it.
- Test It in Context: Always check your normal map on an actual 3D model under a few different lighting conditions. What looks good in one setup might not work as well in another.
Using AI to Generate Normal Maps Instantly
Traditional methods of making normal maps are effective, but they can require significant time and technical knowledge. Now, a different approach is transforming texturing workflows: using AI to generate high-quality normal maps in seconds.
It represents a major leap in efficiency.
Imagine uploading a simple 2D texture—a photo of a rock face, a piece of fabric, or a sci-fi metal plate—and letting an AI intelligently analyze it. These tools interpret the visual data, identify patterns, and generate a corresponding normal map that simulates depth and detail with impressive accuracy.
The results often rival what you'd get from a manual conversion, and in some cases, they can be even better.
A Catalyst for Rapid Iteration
For anyone working against a deadline, this workflow can be a lifesaver. Being able to instantly create variations or test new ideas without the usual technical hurdles provides immense creative freedom. An artist can texture an entire scene or prototype a dozen material options in a fraction of the time it used to take.
This isn't about replacing artists; it's about providing them with a powerful assistant. AI handles the repetitive, technical parts of normal map creation, which frees you up to focus on what really matters—art direction, composition, and visual storytelling.
We're seeing AI-powered texturing tools reduce creation time by up to 90% for certain assets. This kind of speed allows teams to put more resources into creative exploration and polish, leading to a much better final product.
And it’s not just about normal maps. Many of these platforms can generate entire PBR material sets from a single image. We dive deeper into how this works in our guide to AI texture generation and its growing impact on 3D pipelines.
By integrating AI into your process, you can accomplish tasks faster, whether you're texturing a game level or mocking up assets for a marketing visual. It’s becoming an indispensable part of the modern 3D artist's toolkit.
Fine-Tuning Your Normal Maps for Professional Results
Generating a normal map file is a great start, but it’s just the beginning. The real artistry lies in how you use it—that’s what separates decent 3D art from work that looks truly professional.
Polishing your asset is a mix of technical knowledge and creative judgment. It’s about ensuring your details look impressive and believable under any lighting condition. These finishing touches are what make your models stand out.
One of the first technical hurdles you'll encounter is bit depth. A standard 8-bit image, like a JPG, can only store 256 shades of color per channel. For a really smooth, curved surface, that's often not enough, which can result in visible "banding" artifacts.
This is why professionals almost always work with 16-bit images. A 16-bit format like PNG or TIFF can handle over 65,000 levels of color, giving you perfectly smooth gradients and ultra-accurate details. It is a non-negotiable standard for high-quality work.
DirectX vs. OpenGL: The Green Channel Flip
Here’s a common technical issue that can affect even seasoned artists: the normal map format. Different applications and game engines interpret the green channel of your normal map differently.
- OpenGL (Y+): This is the standard for tools like Blender and Unity. The green channel’s Y-direction points up.
- DirectX (Y-): Used by major platforms like Unreal Engine and 3ds Max. Here, the Y-direction points down.
If you import your model and the lighting looks inverted or incorrect, it’s almost always a green channel issue. Fortunately, most baking software has a simple checkbox to export for DirectX or OpenGL. Always confirm what your target engine requires to save yourself the headache.
The right technical format is non-negotiable, but the artistic feel is where you can excel. The strength of your normal map should feel appropriate for the material. Subtle leather grain needs a gentle touch, while deep rock crevices demand high intensity.
Finally, remember that a normal map never works in isolation. Its true power is realized when you pair it with other PBR maps.
The way light bounces off the tiny bumps defined by your normal map is directly controlled by your roughness map. A shiny, wet surface will react to light completely differently than a dry, matte one. Add a metallic map to define the material even further, and you’ll have a dynamic, believable asset that looks fantastic from every angle.
Common Normal Map Questions, Answered
As you become more familiar with creating normal maps, a few common problems tend to arise. Here are some quick answers to the technical issues that artists frequently encounter.
"Why Does My Normal Map Look Wrong or Inverted?"
This is by far the most common issue, and the cause is almost always an OpenGL vs. DirectX mismatch. It all comes down to the green channel.
Different tools read this "Y" direction differently. Game engines like Unreal Engine use the DirectX (Y-) standard, while programs like Blender and Unity default to OpenGL (Y+). If your lighting seems to come from the wrong direction or the details look carved in instead of popping out, you have a format mismatch.
Always check what your target engine needs before you bake. Selecting the right option in your baking settings can save you hours of troubleshooting.
"Can I Edit the Normal Map in Photoshop?"
While you can, it is generally not recommended. It’s acceptable for minor adjustments—like increasing the overall intensity—but trying to paint fixes directly onto the map is a recipe for error.
Every RGB value in a normal map is a precise 3D vector telling the engine which way a surface is facing. Trying to paint the exact color needed to fix an angle by hand is practically impossible.
If there is a significant problem with the bake, the only reliable solution is to return to your high-poly model, make adjustments, and then rebake the map from scratch.
"What’s the Difference Between a Normal Map and a Bump Map?"
They both simulate surface detail, but they do so in very different ways.
- A bump map is a simple grayscale image. It can only tell the surface to go "in" or "out" based on black and white values. Think of it as pushing pixels straight up or down.
- A normal map is a full-color RGB image where each color channel corresponds to an X, Y, or Z direction. This allows it to create incredibly complex and believable illusions of depth, simulating surfaces that curve and angle in any direction.
"Should I Use 8-bit or 16-bit for My Normal Map?"
If you have the option, always choose a 16-bit normal map, usually saved as a PNG or TIFF.
An 8-bit image only has 256 levels of color information per channel. On smooth, curving surfaces, this can lead to visible steps known as "banding."
A 16-bit image, on the other hand, contains over 65,000 levels of color data. That massive jump in precision gives you incredibly smooth gradients and far more accurate details—it’s a non-negotiable standard for professional-quality assets.
Ready to accelerate your creative workflow? Virtuall uses AI to generate high-quality 3D models and textures from simple text and images, cutting down production time dramatically. Discover how Virtuall can help your team create more, faster.

