How to Make a Transparent PNG for Logos, Game Icons and Sprites
Make a transparent PNG for logos, game icons, sprites and product cutouts. Describe or upload an image, click Cut, check the edge and download.
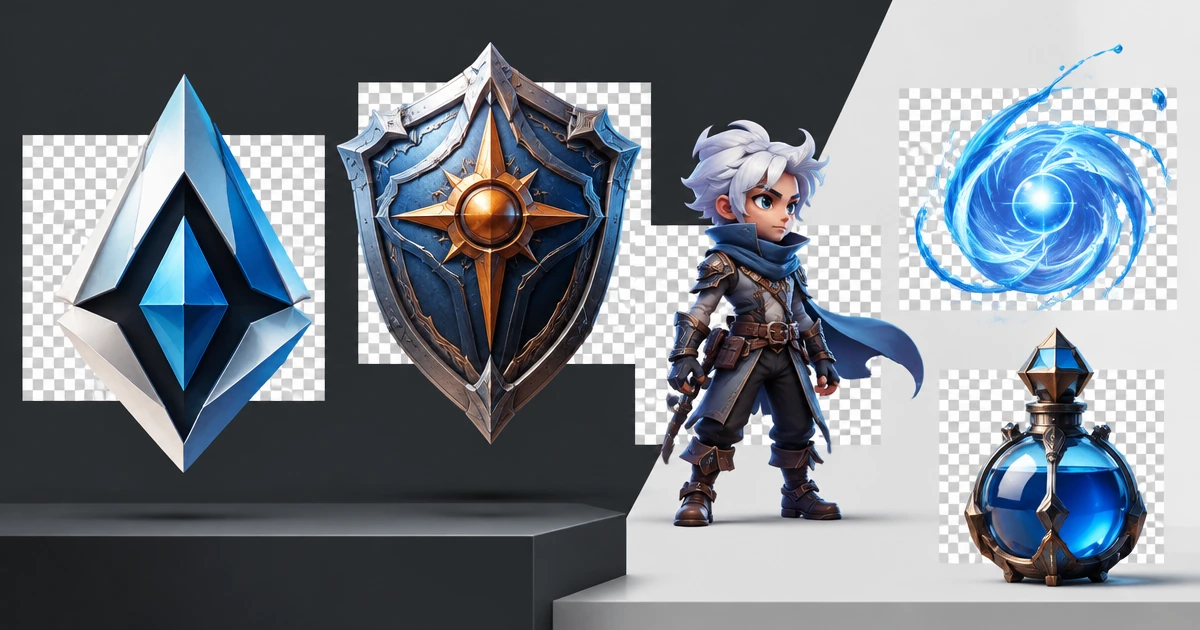
To make a transparent PNG in the Creative AI OS, describe what you want or upload a reference, generate or select the image, then click Cut. The background is removed and the asset is ready to download as a transparent PNG. That is the complete workflow: no separate background-removal site, no export-and-reimport loop, and no manual masking for a straightforward cutout.
The same process works for a logo, game icon, character, sprite, prop, product image, sticker, overlay, or visual effect. What changes is not the button. It is how you prepare the image and how you check the result before using it.
Start Creating in the Creative AI OS.
How to create a transparent PNG in one workspace
- Describe the asset or upload a reference. Start with a prompt, an existing logo, concept art, a product image, or another visual you want to turn into a cutout.
- Generate or select the image. Choose the version with the clearest silhouette and the fewest unnecessary background details.
- Click Cut. The Creative AI OS separates the subject from its background.
- Check the edge. View the result over both a light and a dark background. Look closely at hair, glow, smoke, thin lines, detached details, and soft shadows.
- Download the PNG. The transparency is stored in the file, so the asset can sit over another image, interface, scene, presentation, or video without a rectangular background.
If you already have an approved asset, upload it and go straight to Cut. If you need a new asset, generate it in the same workspace first. This is particularly useful for teams creating many related icons, props, characters, and campaign variants: the source, iterations, cutout, review, and final file remain together.
What is a transparent PNG?
A transparent PNG is an image file that stores opacity as well as colour. Each pixel can be visible, invisible, or partly transparent. That extra information is called the alpha channel.
Partial transparency is what keeps a soft shadow soft and lets anti-aliased curves, hair, glass, smoke, and glowing effects blend into a new background. The grey-and-white checkerboard shown in many editors is only a preview of empty space; it is not part of the exported image.
The PNG specification supports full-colour images with a separate alpha channel. In everyday design language this is often called PNG-32 or RGBA. The formal definition is available in the W3C PNG specification.
Prepare the image for a clean Cut
Cut can remove a background in one click, but the source image still affects edge quality. A clear input produces a cleaner and more predictable asset.
- Keep the full silhouette visible. Do not crop the top of a logo, the tip of a sword, a character's hair, or the edge of a product.
- Separate the subject from the background. Strong contrast helps when the asset contains fine outlines or small detached parts.
- Use a simple composition. One main asset is easier to separate than several overlapping subjects.
- Avoid unnecessary contact shadows. Ask for “isolated, no ground shadow” when the asset should float freely.
- Use enough resolution. Start larger than the final display size when the asset has type, fine ornament, or a complex edge.
- State the intended view. “Front-facing game inventory icon” produces a different result from “three-quarter product render.”
Prompt examples
| Asset | Example direction | Check before export |
|---|---|---|
| Logo mark | “Simple geometric compass mark, bold silhouette, flat colours, centered, isolated, no shadow.” | Small gaps, symmetry, clean curves, no extra texture. |
| Game icon | “Polished fantasy shield inventory icon, front view, readable at 128 pixels, isolated, no background.” | Silhouette at small size, border clarity, no clipped ornament. |
| Character sprite | “Full-body stylized ranger, neutral pose, complete boots and weapon, even lighting, isolated.” | Hair, fingers, weapon tips, detached straps and consistent canvas. |
| VFX element | “Blue magical energy ring, centered, soft glowing edge, no scene or floor.” | Partial transparency, smooth falloff, no dark box around the glow. |
| Product cutout | “Front three-quarter studio view, complete object, soft even lighting, no floor shadow.” | Reflections, glass, handles, fine edges and retained product shape. |
Transparent logos and wordmarks
A transparent logo can be placed on a website, slide, video, package mock-up, social post, or game screen without carrying a white rectangle with it. For a simple raster logo, PNG is a dependable delivery format because it keeps sharp edges and transparency without JPEG compression artefacts.
However, keep the vector master whenever one exists. SVG is usually the better format for a logo that must scale to any size, change colour in code, or go to print. Use transparent PNG for places that need a raster image or cannot accept SVG.
When cutting a wordmark, inspect enclosed spaces inside letters and narrow gaps between characters. The background should be removed around the mark and inside those spaces without erasing fine strokes. Test the result over white, black, and one saturated colour.
Game icons, UI elements and sprites
Transparent PNGs are standard source assets for inventory icons, HUD elements, characters, props, decals, particles, and 2D scene elements. The Creative AI OS can generate the art and create the cutout in the same flow, which removes a common handoff between generation and asset preparation.
Icons should be judged at their real display size. A detailed shield may look clean at 1024 pixels and become unreadable at 64 pixels. Check the silhouette, focal point, contrast, and border after scaling.
Sprites need additional care:
- Keep the same canvas size and anchor point across animation frames.
- Protect detached details such as arrows, antennae, particles, straps, and weapon tips.
- For pixel art, inspect at native size with nearest-neighbour scaling so soft edge pixels do not change the intended style.
- Clean each frame before packing it into a sprite sheet.
- Add suitable spacing or edge extrusion in the atlas workflow to reduce colour bleeding between neighbouring frames.
Explore more examples in the Creative AI OS for game studios, including characters, props, VFX, icons, sprites, and production-ready transparent PNGs.
Product cutouts, stickers, overlays and visual effects
The same Cut workflow supports commerce and marketing work. A product cutout can be placed into new campaign layouts; a sticker can be reused across channels; an isolated presenter or object can be composited into video; and a glow, smoke plume, or magical effect can sit over a game scene.
Hard-edged objects are usually the simplest. Hair, fur, glass, translucent fabric, motion blur, smoke, and light effects need more careful review because the edge contains partly transparent pixels. A correct result should blend naturally over both bright and dark backgrounds rather than showing a pale or dark fringe.
How to check a transparent PNG before download
- Use contrasting backgrounds. Check light, dark, and saturated colours. A checkerboard alone can hide edge problems.
- Zoom in, then zoom out. Inspect individual edge details and then confirm that the complete silhouette reads at its intended size.
- Look for clipped content. Small disconnected parts are the easiest details to lose.
- Check unwanted shadows. Keep a shadow only when it belongs in every future placement.
- Test the destination. Place the file in the game engine, layout, website, or presentation where it will actually be used.
- Keep the source. Preserve the original and the cut version so the team can revise the edge or create another format later.
Why transparent edges sometimes show a white or dark outline
A halo can come from the original background colour contaminating partly transparent edge pixels. It can also appear when a renderer treats alpha differently from the editor that exported the file, or when scaling and texture filtering sample colour hidden in transparent pixels.
First determine where the issue begins. If the outline is visible over a contrasting colour in the editor, correct the source edge. If the PNG looks clean in the editor but not in a game engine, inspect the engine's alpha handling, texture filtering, mipmaps, atlas padding, and compression. Microsoft’s explanation of straight and premultiplied alpha describes why a mismatch can produce bright or dark edges.
PNG, WebP, SVG or JPG?
| Format | Use it for | Important limitation |
|---|---|---|
| PNG | Logos, icons, sprites, UI, overlays, cutout products, and source assets that need lossless pixels and transparency. | Files can be larger than modern web formats. |
| WebP | Transparent images delivered on websites where reducing transfer size matters. | Keep a high-quality source and test the selected compression settings. |
| SVG | Vector logos, symbols, and simple illustrations that must scale without losing sharpness. | Not suitable for ordinary photographic cutouts or painted sprites. |
| JPG | Opaque photographs and large backgrounds where a smaller lossy file is acceptable. | JPG does not preserve an alpha channel, so it cannot carry a transparent background. |
For a deeper format comparison, read How to Convert WebP to PNG for Creative Workflows. For an older manual approach to selection and masking, see A Guide to Delete Background in Photoshop.
Transparent PNG production checklist
- The complete subject is visible.
- The background is fully removed where it should be.
- Fine and detached details remain intact.
- Soft edges and glows retain partial transparency.
- No white, dark, or coloured halo appears on contrasting backgrounds.
- The asset reads clearly at its intended size.
- Sprites retain consistent canvas size and alignment.
- The file is downloaded as PNG, not JPG.
- The result has been tested in its final destination.
- The original source remains available for revision.
Frequently asked questions
How do I make a PNG background transparent? In the Creative AI OS, describe the asset you want or upload a reference, generate or select the image, click Cut, review the edge, and download the result as a transparent PNG.
Can I create a transparent PNG from a prompt? Yes. Describe the logo, icon, sprite, character, product, or effect you need, generate it, and click Cut to remove the background. Asking for an isolated subject, full silhouette, and no ground shadow usually gives the cleanest starting point.
How do I remove the background from a logo or game sprite? Upload the existing logo or sprite to the Creative AI OS and click Cut. Then inspect enclosed logo spaces, fine outlines, detached sprite details, and alignment before downloading the PNG.
Why does my transparent PNG have a white or dark outline? The edge may still contain colour from the old background, or the destination may be using a different alpha or filtering method. Test over contrasting backgrounds to identify whether the problem is in the file or the renderer.
Is PNG better than WebP or SVG for transparency? It depends on the asset. PNG is a strong general format for lossless raster cutouts, icons, sprites, and overlays. WebP can reduce website delivery size, while SVG is usually better for a vector logo that must scale indefinitely.
Create, cut and use the asset
A transparent PNG should not require a chain of disconnected tools. In the Creative AI OS, you can create the asset from a description or reference, click Cut, review it, and download it from the same workspace. The result is ready for a game engine, campaign layout, website, presentation, video composite, or shared asset library.
Start Creating with the Creative AI OS.